client-go 源码学习系列:
- client-go 之概述篇
- client-go 之 Informer 篇
- client-go 之 WorkQueue 篇
前言
在第一篇的概述中,我给大家展示过一张来自官方的 Informer 的处理流程图,在第二篇中,主要和大家介绍并分析了 client-go 中的 Informer 机制及具体实现,即处理流程图中 client-go 的部分,而本篇中主要讲述的是在 Custom Controller 中的 WorkQueue 部分。其实对于这部分,并不是必不可少的,因为使用者完全可以不使用 WorkQueue,而是收到分发的事件,直接进行逻辑的处理,但是这种做法,个人觉得不是很提倡这样使用,因为直接处理的话,会是的整个的 Informer 的事件处理能力下降,从而导致事件的积累,从而导致不可预知的问题。对于使用 WorkQueue 的用户,client-go 中提供了延时队列及速率限制队列对使用者进行保护。而这篇文章则是和大家分析下 client-go 中 WorkQueue 的不同实现。从而在使用的时候,可以选择合适自己的队列实现方式。
WorkQueue 概述
上篇 client-go 中简单的描述过,client-go 中提供了三种队列的接口
-
Interface: FIFO 队列接口,并支持去重处理。 -
DelayingInterface: 延迟队列接口,基于Interface接口封装。 -
RateLimitingInterface: 速率限制接口,基于DelayingInterface接口封装。
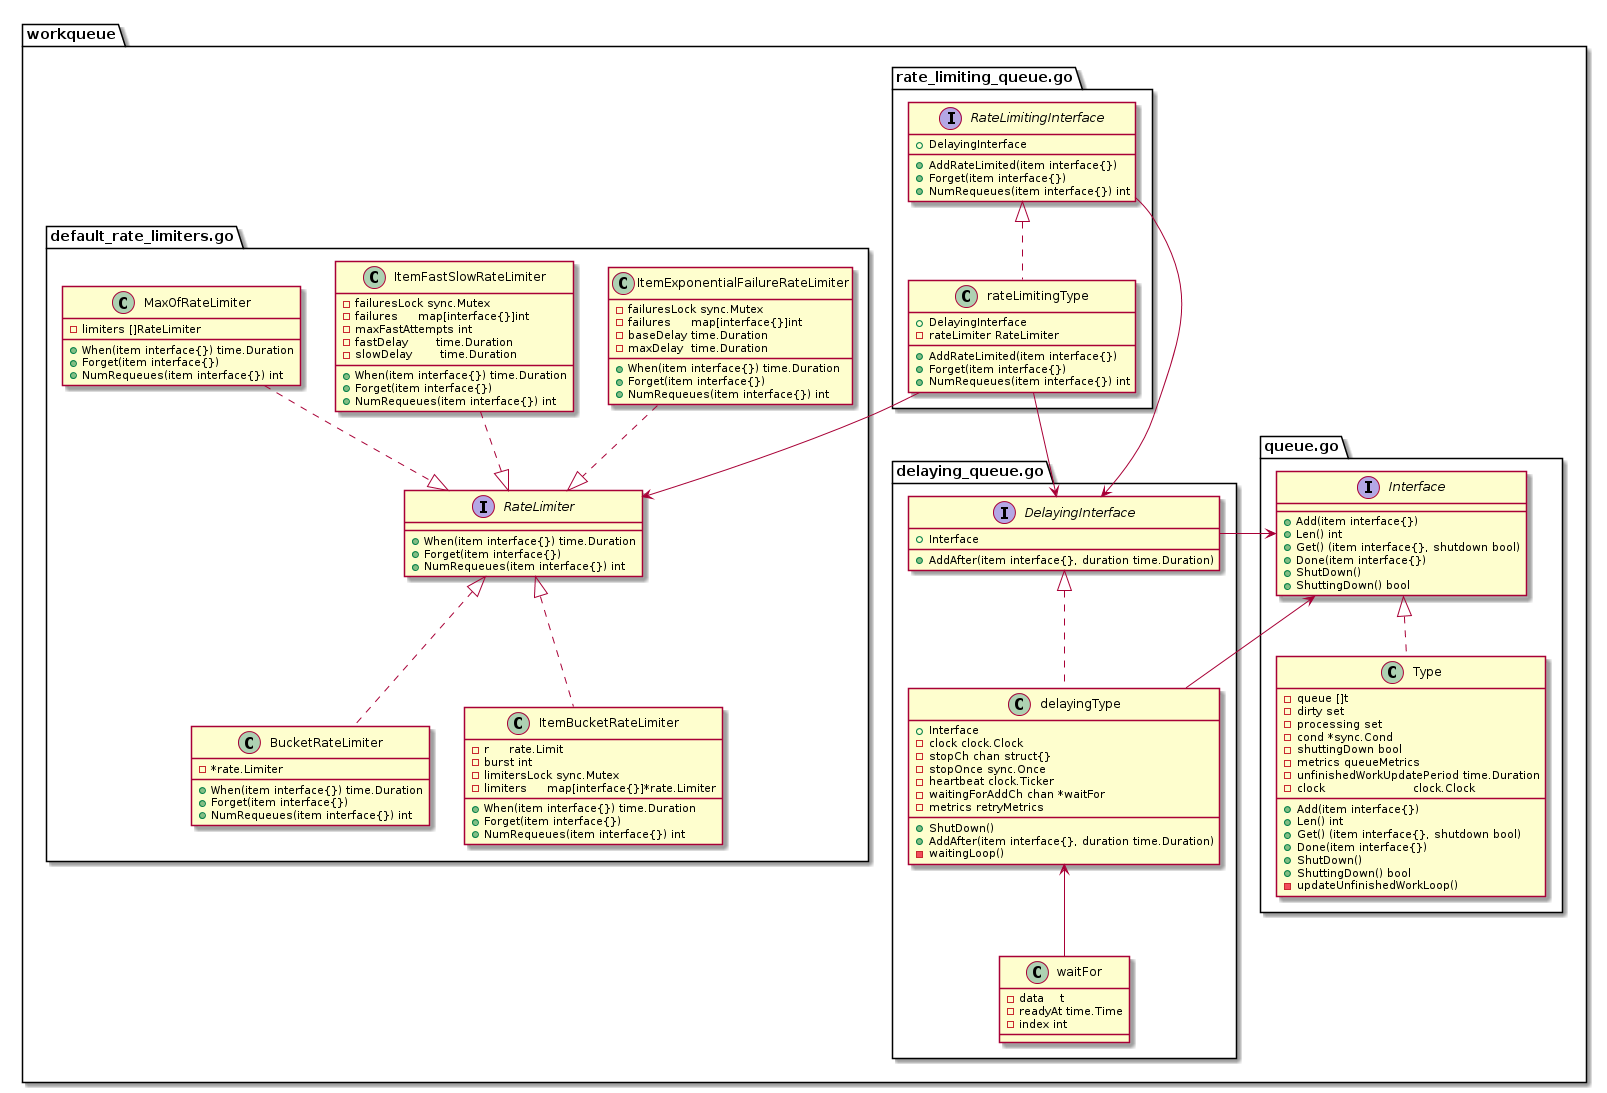
三者直接的类图如下:
底层的 FIFO 队列
首先是底层的 FIFO 队列的实现。
下面给出具体的定义
type Interface interface {
    Add(item interface{})
    Len() int
    Get() (item interface{}, shutdown bool)
    Done(item interface{})
    ShutDown()
    ShuttingDown() bool
}

// Type is a work queue (see the package comment).
type Type struct {
    // queue defines the order in which we will work on items. Every
    // element of queue should be in the dirty set and not in the
    // processing set.
    queue []t

    // dirty defines all of the items that need to be processed.
    dirty set

    // Things that are currently being processed are in the processing set.
    // These things may be simultaneously in the dirty set. When we finish
    // processing something and remove it from this set, we'll check if
    // it's in the dirty set, and if so, add it to the queue.
    processing set

    cond *sync.Cond

    shuttingDown bool

    metrics queueMetrics

    unfinishedWorkUpdatePeriod time.Duration
    clock                      clock.Clock
}

type empty struct{}
type t interface{}
type set map[t]empty
这里定义了一个 Interface 接口,提供了几种方法。然后 Type 结构实现了 Interface 接口。所以这里的 Type 结构是一个底层的 FIFO 队列的实现。
从 Type 结构体中我们可以看到定义了三个集合,queue 是一个值为 interface 类型的 slice,ditry 是一个 key 为 interface 类型的 map,processing 一个是 key 为 interface 类型的 map。 而这个 FIFO 队列就是通过这三个属性实现了数据处理逻辑。下面我们将分析不同方法对应的这三个属性之间数据转换来理解 FIFO 队列的实现。
Add 方法实现逻辑
这里我们先分析 Add 方法的实现逻辑。
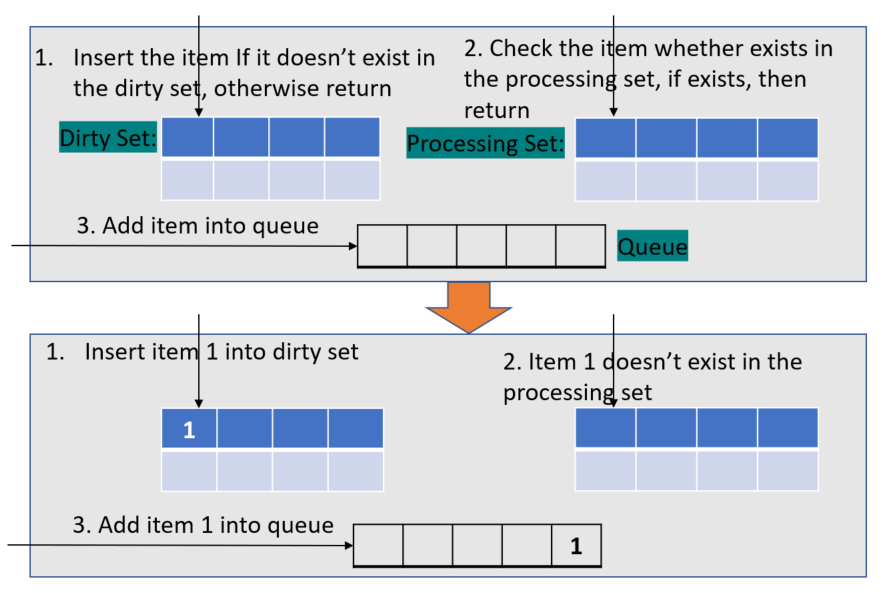
// Add marks item as needing processing.
func (q *Type) Add(item interface{}) {
    q.cond.L.Lock()
    defer q.cond.L.Unlock()
    if q.shuttingDown {
        return
    }
    if q.dirty.has(item) {
        return
    }

    q.metrics.add(item)

    q.dirty.insert(item)
    if q.processing.has(item) {
        return
    }

    q.queue = append(q.queue, item)
    q.cond.Signal()
}
Add 方法基本分为一下三步:
-
判断 dirty 中是否存在 item,如果存在则返回,如果不存在则执行下一步。
-
将 item 插入 dirty 中,再判断 item 是否在 processing 中,如果存在则返回,否则执行下一步。
-
将 item 追加到 queue 中。
下面给出一个示例图可供参考:
Get 方法实现逻辑
这里我们再来看看 Get 方法。
// Get blocks until it can return an item to be processed. If shutdown = true,
// the caller should end their goroutine. You must call Done with item when you
// have finished processing it.
func (q *Type) Get() (item interface{}, shutdown bool) {
    q.cond.L.Lock()
    defer q.cond.L.Unlock()
    for len(q.queue) == 0 && !q.shuttingDown {
        q.cond.Wait()
    }
    if len(q.queue) == 0 {
        // We must be shutting down.
        return nil, true
    }

    item, q.queue = q.queue[0], q.queue[1:]

    q.metrics.get(item)

    q.processing.insert(item)
    q.dirty.delete(item)

    return item, false
}
这里可以看到
-
如果 queue 中没有 item,则会一直等待在这里,
-
而如果有事件过来,但是 queue 还是空,则会返回,并会设置 shutting down 标志,
-
而如果 queue 中有元素,则取出 queue 中的第一个元素并从 queue 中删除,然后再插入到 processing 中,最后将该元素从 dirty 中删除。
下面给出一个示例图可供参考:
Done 方法实现逻辑
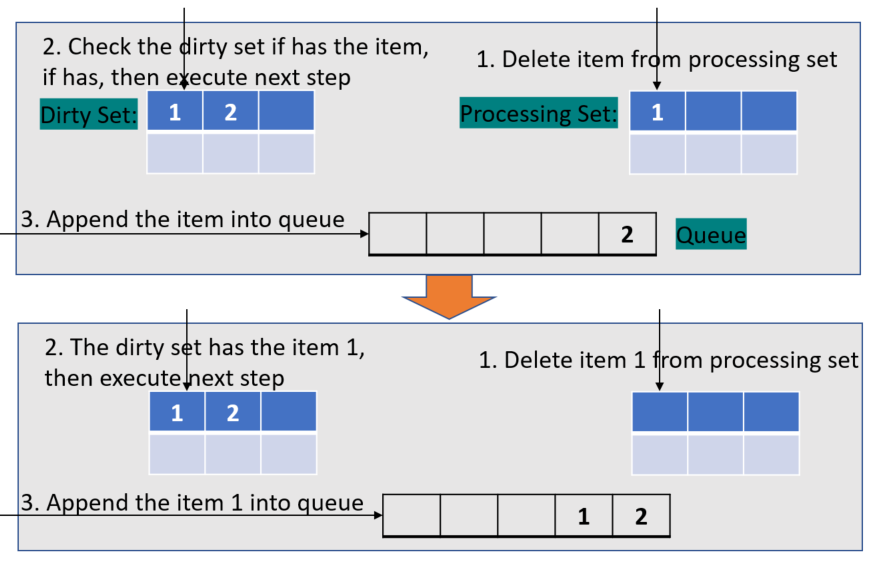
// Done marks item as done processing, and if it has been marked as dirty again
// while it was being processed, it will be re-added to the queue for
// re-processing.
func (q *Type) Done(item interface{}) {
    q.cond.L.Lock()
    defer q.cond.L.Unlock()

    q.metrics.done(item)

    q.processing.delete(item)
    if q.dirty.has(item) {
        q.queue = append(q.queue, item)
        q.cond.Signal()
    }
}
这里 Done 方法比较简单。
-
将 item 从 processing 中删除
-
判断 item 是否存在 dirty 中,如果存在,则叫 item 追加到 queue 中。
而这里为什么会判断 dirty 中含有该 item,是因为在 Get 方法和 Done 方法之间不是原子操作,所以 item 有可能在这之间被 Add 进 dirty 中。
下面给出一个示例图可供参考:
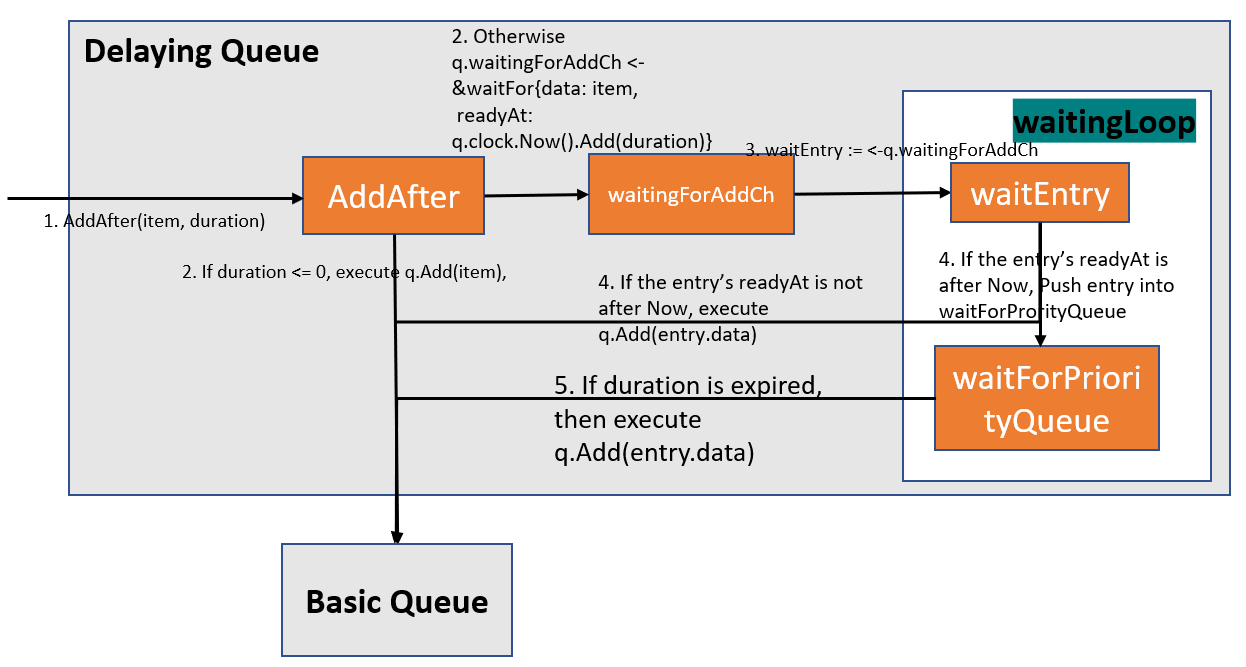
Delaying 队列
DelayingInterface 是一个 Interface 并且添加了 AddAfter 方法。并且我们可以看到在创建 DelayingQueue 的时候,是创建了一个底层的 FIFO 的。并异步调用了个 ret.waitingLoop()。
// DelayingInterface is an Interface that can Add an item at a later time. This makes it easier to
// requeue items after failures without ending up in a hot-loop.
type DelayingInterface interface {
    Interface
    // AddAfter adds an item to the workqueue after the indicated duration has passed
    AddAfter(item interface{}, duration time.Duration)
}

// NewDelayingQueueWithCustomClock constructs a new named workqueue
// with ability to inject real or fake clock for testing purposes
func NewDelayingQueueWithCustomClock(clock clock.Clock, name string) DelayingInterface {
    ret := &delayingType{
        Interface:       NewNamed(name),
        clock:           clock,
        heartbeat:       clock.NewTicker(maxWait),
        stopCh:          make(chan struct{}),
        waitingForAddCh: make(chan *waitFor, 1000),
        metrics:         newRetryMetrics(name),
    }

    go ret.waitingLoop()

    return ret
}
我们先来看看 waitingLoop() 函数的实现。
// waitingLoop runs until the workqueue is shutdown and keeps a check on the list of items to be added.
func (q *delayingType) waitingLoop() {
    defer utilruntime.HandleCrash()

    // Make a placeholder channel to use when there are no items in our list
    never := make(<-chan time.Time)

    // Make a timer that expires when the item at the head of the waiting queue is ready
    var nextReadyAtTimer clock.Timer

    waitingForQueue := &waitForPriorityQueue{}
    heap.Init(waitingForQueue)

    waitingEntryByData := map[t]*waitFor{}

    for {
        if q.Interface.ShuttingDown() {
            return
        }

        now := q.clock.Now()

        // Add ready entries
        for waitingForQueue.Len() > 0 {
            entry := waitingForQueue.Peek().(*waitFor)
            if entry.readyAt.After(now) {
                break
            }

            entry = heap.Pop(waitingForQueue).(*waitFor)
            q.Add(entry.data)
            delete(waitingEntryByData, entry.data)
        }

        // Set up a wait for the first item's readyAt (if one exists)
        nextReadyAt := never
        if waitingForQueue.Len() > 0 {
            if nextReadyAtTimer != nil {
                nextReadyAtTimer.Stop()
            }
            entry := waitingForQueue.Peek().(*waitFor)
            nextReadyAtTimer = q.clock.NewTimer(entry.readyAt.Sub(now))
            nextReadyAt = nextReadyAtTimer.C()
        }

        select {
        case <-q.stopCh:
            return

        case <-q.heartbeat.C():
            // continue the loop, which will add ready items

        case <-nextReadyAt:
            // continue the loop, which will add ready items

        case waitEntry := <-q.waitingForAddCh:
            if waitEntry.readyAt.After(q.clock.Now()) {
                insert(waitingForQueue, waitingEntryByData, waitEntry)
            } else {
                q.Add(waitEntry.data)
            }

            drained := false
            for !drained {
                select {
                case waitEntry := <-q.waitingForAddCh:
                    if waitEntry.readyAt.After(q.clock.Now()) {
                        insert(waitingForQueue, waitingEntryByData, waitEntry)
                    } else {
                        q.Add(waitEntry.data)
                    }
                default:
                    drained = true
                }
            }
        }
    }
}
这个函数则是 Delaying 的主要实现逻辑。从代码中可以看到它通过接受一些 channel 信号,然后进行处理。例如如果 duration 时间到了,则将元素添加到底层的 FIFO queue 中,如果没到则添加到 waitingForQueue 中后续判断处理。等到 duration 时间到了,然后将该元素添加到 FIFO Queue 中。
我们再来看看 AddAfter 函数的实现。
// AddAfter adds the given item to the work queue after the given delay
func (q *delayingType) AddAfter(item interface{}, duration time.Duration) {
    // don't add if we're already shutting down
    if q.ShuttingDown() {
        return
    }

    q.metrics.retry()

    // immediately add things with no delay
    if duration <= 0 {
        q.Add(item)
        return
    }

    select {
    case <-q.stopCh:
        // unblock if ShutDown() is called
    case q.waitingForAddCh <- &waitFor{data: item, readyAt: q.clock.Now().Add(duration)}:
    }
}
这个函数则是添加 item 到 work queue 的函数。这里会对传入的 duration 进行判断,如果duration <= 0,则直接添加到 queue 中,否则将 item 和 duration 一起封装到 waitFor 结构中,并传入 waitingForAddCh 管道中。以触发上面的 waitingLoop 进行处理。
具体的实现逻辑可参考下图:
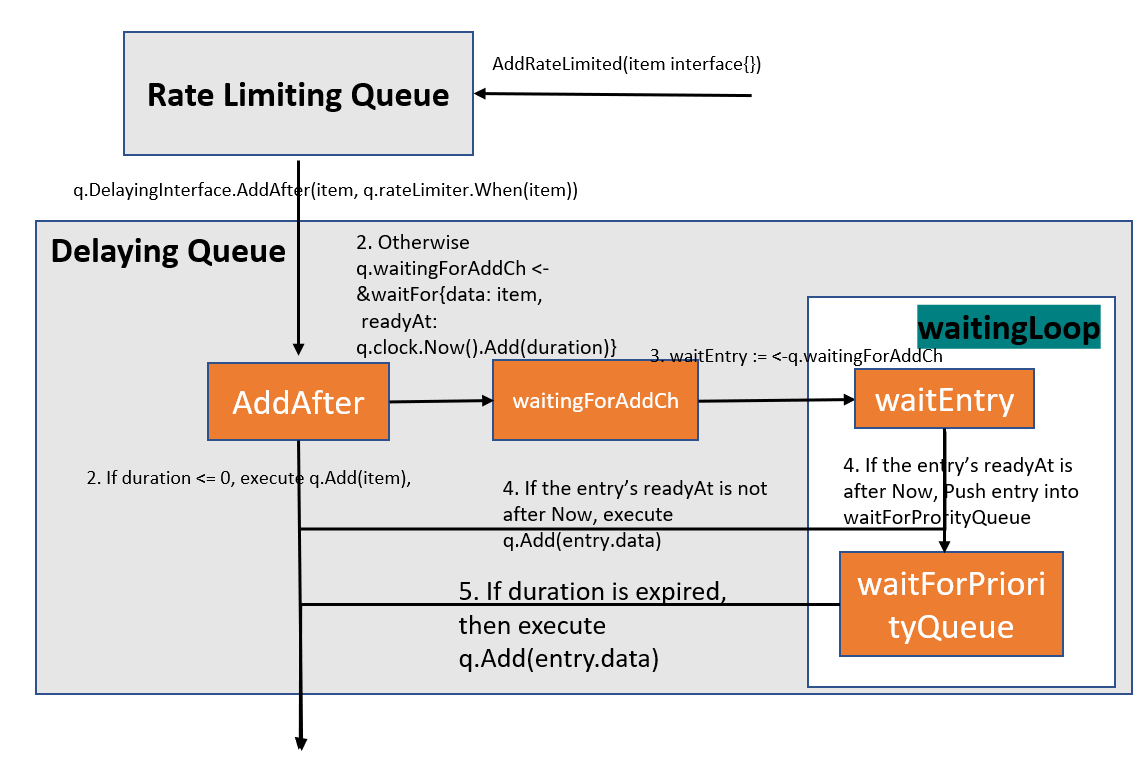
Rate Limiting 队列
RateLimitingInterface 则是在 DelayingInterface 上再封装了一层。提供了更多的接口。而这些接口都是对于 rate limiter 进行出入,算出 duration 值,并通过调用 DelayingInterface 的 AddAfter 方法将 item 添加到 Queue 中。
// RateLimitingInterface is an interface that rate limits items being added to the queue.
type RateLimitingInterface interface {
    DelayingInterface

    // AddRateLimited adds an item to the workqueue after the rate limiter says it's ok
    AddRateLimited(item interface{})

    // Forget indicates that an item is finished being retried.  Doesn't matter whether it's for perm failing
    // or for success, we'll stop the rate limiter from tracking it.  This only clears the `rateLimiter`, you
    // still have to call `Done` on the queue.
    Forget(item interface{})

    // NumRequeues returns back how many times the item was requeued
    NumRequeues(item interface{}) int
}

func NewNamedRateLimitingQueue(rateLimiter RateLimiter, name string) RateLimitingInterface {
    return &rateLimitingType{
        DelayingInterface: NewNamedDelayingQueue(name),
        rateLimiter:       rateLimiter,
    }
}

// rateLimitingType wraps an Interface and provides rateLimited re-enquing
type rateLimitingType struct {
    DelayingInterface

    rateLimiter RateLimiter
}

// AddRateLimited AddAfter's the item based on the time when the rate limiter says it's ok
func (q *rateLimitingType) AddRateLimited(item interface{}) {
    q.DelayingInterface.AddAfter(item, q.rateLimiter.When(item))
}

func (q *rateLimitingType) NumRequeues(item interface{}) int {
    return q.rateLimiter.NumRequeues(item)
}

func (q *rateLimitingType) Forget(item interface{}) {
    q.rateLimiter.Forget(item)
}
从上面代码可以看出我们在调用 NewNamedRateLimitingQueue 函数创建 RateLimitingQueue 的时候,传入了 RateLimiter 的对象,而 rateLimitingType 的 AddRateLimited 方法中则是调用 DelayingInterface 的 AddAfter 方法,并通过 rateLimiter 计算出来的 duration 传入。而其他两个方法则直接调用 rateLimiter 的方法进行处理。
从而我们可以分析出,RateLimitingQueue 主要是通过 RateLimiter 接口的具体实现者的逻辑进行处理的。
具体的实现逻辑可参考下图:
RateLimiter 介绍
从上面 RateLimitingQueue 中我们有说过它的具体实现逻辑是 RateLimiter 的实现者进行的。下面我们来分析下 RateLimiter。
type RateLimiter interface {
    // When gets an item and gets to decide how long that item should wait
    When(item interface{}) time.Duration
    // Forget indicates that an item is finished being retried.  Doesn't matter whether its for perm failing
    // or for success, we'll stop tracking it
    Forget(item interface{})
    // NumRequeues returns back how many failures the item has had
    NumRequeues(item interface{}) int
}
WorkQueue 中提供的默认支持的 RateLimiter:
- BucketRateLimiter
- ItemBucketRateLimiter
- ItemExponentialFailureRateLimiter
- ItemFastSlowRateLimiter
- MaxOfRateLimiter
对于这些默认提供的 RateLimiter,此处我们就不分析了。它们之间主要不同也就是根据不同的算法算出 duration 的时间,来决定 Item 是什么能够加入队列中,从而实现了速率限制功能。
NOTE: 由于 RateLimiter 是一个接口类型,所以如果默认支持的 RateLimiter 不能够满足你的需求,你可以通过实现 RateLimiter 的接口来自定义一个速率限制器。
总结
WorkQueue 在 informer 机制中主要是在 Controller 部分的组件,因此当你在阅读 controller-manager 源码的时候将会频繁看到它的使用。因为 WorkQueue 中提供的延时队列和速率限制队列在实际使用中会经常用到。例如速率队列来说,它能够很好的控制调用者的处理速度,防止调用者出现很大的波动,更能够使得调用者不会因为负载太高而处理不过来导致失败。