什么是准入 webhook
准入 webhooks 是一个接收 admission 请求并对其做些处理的 HTTP 回调。你可以定义两种准入 webhook,validating admission webhook and mutating admission webhook。mutating admission webhook 首先被调用,然后可以修改请求内容,再发送到 API server 去执行。当所有的内容修改执行完成后,就会执行到了 validating 的过程,此时会调用 validating admission webhook 去执行自定义的策略。
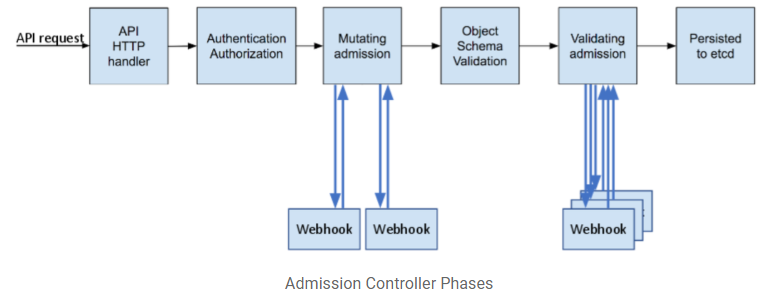
下图展示了整个准入控制器阶段
编写自定义的动态准入 webhook
你可以参考 example, 这个例子实现了一个自定义的** validating admission webhook**, 并且可以自动的生成证书去更新 validatingwebhookconfiguration 中的 ca_Bound. 后面将增加 mutating admission webhook 的例子。目前下面我将按照这个例子演示怎么编写自定义的准入 webhook.
前提条件
-
确保 k8s cluster 版本比 v1.16 (to use admissionregistration.k8s.io/v1) 新或者等于,或者 v1.9 (to use admissionregistration.k8s.io/v1beta1).
-
确保开启了 MutatingAdmissionWebhook 和 ValidatingAdmissionWebhook 准入 controllers.
-
确保开启了 admissionregistration.k8s.io/v1 或者 admissionregistration.k8s.io/v1beta1 API
编写 webhook server
首先要编写一个 HTTPS server 作为 webhook server。功能是接收请求并做相应的处理。你可以参考 httpsserver.
func NewServer(port string, whs *webhook.WebhookService, config *tls.Config) *http.Server {

	handler := handler{
		&logic{
			webhookserver: whs,
		},
	}
	h2s := &http2.Server{}

	return &http.Server{
		Addr:      port,
		Handler:   h2c.NewHandler(handler, h2s),
		TLSConfig: config,
	}
}

type logic struct {
	webhookserver *webhook.WebhookService
}

type handler struct {
	logic *logic
}

func (h handler) ServeHTTP(w http.ResponseWriter, r *http.Request) {

	if r.URL.Path == "/validate" {
		h.logic.webhookserver.Server(w, r)
		return
	}
}
主要的处理逻辑可参考下面给出部分处理代码。完整部分可参考 webhookserver.
func (service *WebhookService) Server(
	w http.ResponseWriter, r *http.Request) {

	contentType := r.Header.Get("Content-Type")
	if contentType != "application/json" {
		errorResponse(w, http.StatusUnsupportedMediaType, fmt.Sprintf("Unsupported Content-Type: %s", contentType))
		return
	}
	if r.Body == nil {
		errorResponse(w, http.StatusBadRequest, "Empty request body")
		return
	}

	body, err := ioutil.ReadAll(r.Body)
	if err != nil {
		errorResponse(w, http.StatusBadRequest, fmt.Sprintf("Error reading request body: %s", err.Error()))
		return
	}

	var admissionResponse *v1beta1.AdmissionResponse
	admissionReview := v1beta1.AdmissionReview{}
	deserializer := service.codecs.UniversalDeserializer()
	if _, _, err = deserializer.Decode(body, nil, &admissionReview); err != nil {
		errorResponse(w, http.StatusBadRequest,
			fmt.Sprintf("Error parsing request body: %s", err.Error()))
		return
	} else {
		admissionResponse = service.validate(&admissionReview)
	}
	if admissionResponse != nil {
		admissionReview.Response = admissionResponse
		if admissionReview.Request != nil {
			admissionReview.Response.UID = admissionReview.Request.UID
		}
	}

	resp, err := json.Marshal(admissionReview)
	if err != nil {
		errorResponse(w, http.StatusInternalServerError,
			fmt.Sprintf("could not encode response: %s", err.Error()))
	}
	if _, err := w.Write(resp); err != nil {
		errorResponse(w, http.StatusInternalServerError,
			fmt.Sprintf("could not write response: %s", err.Error()))
	}
}
这里处理了收到哪些 resource,然后做对应的处理。
func (whsvr *WebhookService) validate(ar *v1beta1.AdmissionReview) *v1beta1.AdmissionResponse {
	req := ar.Request

	switch req.Kind.Kind {
	case "Deployment":
		isAllow := false
		//TODO: logic handling
		return &v1beta1.AdmissionResponse{
			Allowed: isAllow,
		}
	case "Scale":
		isAllow := false
		//TODO: logic handling
		return &v1beta1.AdmissionResponse{
			Allowed: isAllow,
		}
	}

	return &v1beta1.AdmissionResponse{
		Allowed: false,
		Result: &metav1.Status{
			Reason: "UnSupported resource",
		},
	}
}
编译代码并生成 docker image
可以参考我提供的简单脚本编译代码。
#!/bin/sh
GOOS=${GOOS:-linux}
GOARCH=${GOARCH:-amd64}
GOBINARY=${GOBINARY:-go}
LDFLAGS="-extldflags -static"
BINDIR=".release/bin"
PACKAGES=`go list ./cmd/...`
export CGO_ENABLED=0

echo "go mod vendor"

go mod vendor

echo "Generating files..."
for i in ${PACKAGES}; do
  NAME=`basename $i`
  echo "Building $i..."
  GOOS=${GOOS} GOARCH=${GOARCH} ${GOBINARY} build -o ${BINDIR}/dynamic-webhook -ldflags "${LDFLAGS}" "${i}"
  echo "Installed .release/bin/dynamic-webhook"
done
构建 docker 镜像,这里需要注意的是,生成的 tag 需要传入。
#!/bin/bash

TAG=$1
docker build --no-cache -t example:$TAG .
rm -rf release
docker tag example:$TAG dokcerhome/sandbox/webhook:$TAG
echo "dokcerhome/sandbox/webhook:$TAG"
添加相应的 k8s 资源
-
添加 validatingwebhookconfiguration
apiVersion: admissionregistration.k8s.io/v1beta1 kind: ValidatingWebhookConfiguration metadata: name: dynamic-admission-webhook-example webhooks: - name: dynamic-admission-webhook-example.{{ .Release.Namespace }}.svc clientConfig: service: namespace: {{ .Release.Namespace | quote }} name: dynamic-admission-webhook-example path: "/validate" port: 10000 caBundle: "" rules: - apiGroups: - apps apiVersions: - v1 operations: - UPDATE resources: - deployments - deployments/scale - replicasets/scale failurePolicy: Ignore -
添加 RBAC 使得程序可以有权限修改 k8s 资源
apiVersion: v1 kind: ServiceAccount metadata: name: dynamic-admission-webhook-example --- apiVersion: rbac.authorization.k8s.io/v1 kind: ClusterRole metadata: name: dynamic-admission-webhook-example rules: - apiGroups: - admissionregistration.k8s.io resources: - validatingwebhookconfigurations verbs: - '*' - apiGroups: - "" resources: - pods - configmaps verbs: - '*' - apiGroups: - "apps" - "extensions" resources: - deployments verbs: - '*' --- apiVersion: rbac.authorization.k8s.io/v1 kind: ClusterRoleBinding metadata: name: dynamic-admission-webhook-example roleRef: apiGroup: rbac.authorization.k8s.io kind: ClusterRole name: dynamic-admission-webhook-example subjects: - kind: ServiceAccount name: dynamic-admission-webhook-example namespace: {{ .Release.Namespace }} -
最后就是 deployment 和 service 使得程序可以部署在 k8s 中
NOTE: 需要将上一步骤生成的 docker 镜像更新下面 deployment 中的 containers.image 中
   apiVersion: apps/v1
   kind: Deployment
   metadata:
     name: dynamic-admission-webhook-example
   spec:
     replicas: 1
     selector:
       matchLabels:
         app.kubernetes.io/name: dynamic-admission-webhook-example
     template:
       metadata:
         labels:
           app: dynamic-admission-webhook-example
       spec:
         serviceAccountName: dynamic-admission-webhook-example
         containers:
         - name: dynamic-admission-webhook-example
           image: dokcerhome/sandbox/webhook:tag
           imagePullPolicy: Always
           args:
           - -validatingwebhookname
           - dynamic-admission-webhook-example
           - -webhookserverport
           - "10000"
           - -servicename
           - dynamic-admission-webhook-example
           - -namespace
           - {{ .Release.Namespace | quote }}
         restartPolicy: Always
   ---
   apiVersion: v1
   kind: Service
   metadata:
     name: dynamic-admission-webhook-example
   spec:
     type: ClusterIP
     ports:
     - name: https-rest
       port: 10000
       targetPort: 10000
     selector:
       app: dynamic-admission-webhook-example
测试
例子中 default 的实现是拒绝任何对 deployment 和 scale 的修改。所以可以使用 kubectl edit 命令修改 deployment,或者使用 kubectl scale 命令修改 replicas。如果命令修改失败,则说明自定义的 validating webhook 是可以工作的。然后可以加上自己的处理逻辑即可。